Create Custom Form to Disable Reply All in Outlook
Outlook is a complete personal information management application. The featured options let you take control of everything that takes place on the platform, right from sending out messages to the arrangement of received emails via specified sorting. Therefore, you can easily customize the application’s functioning according to your need. The following segment shares detailed information on how to disable reply all in Outlook without using any external applications or add-ins.
An Easier Workaround
Instead of going any other way, an alternative that can be implemented in this case is to mention other recipients of the message in BCC field. This way, you can send the message to everyone without the others know about other recipients. Moreover, even if they use Reply to All feature, the message will only be sent to the sender and none others.
However, this could be a little restrictive and a procedure that requires your attention every time you want to use it. Therefore, the following method could prove more automated and convenient to use.
Create Form to Customize Reply to All and Forwarding
Custom forms offer a basic method for restricting the actions that can be performed by recipients of your message. However, an important point to be noted here is that the recipients’ must all have Microsoft Outlook in use while accessing and replying to the message. The change in email application can disable all the restrictions applied to the mail using custom form.
NOTE: The following steps have been performed using Outlook 2010 version to disable Reply All in Outlook.
1. Click on Developer tab on your Outlook window.
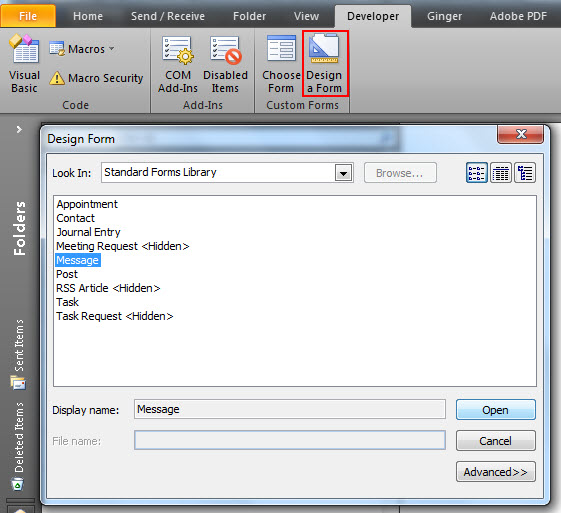
TIP: If you can’t see Developer tab on your Outlook go to File menu > Options > Custom Ribbon and select the checkbox for Developer and click Ok to save changes.2. From the Custom Forms group select Design a Form to begin with custom form creation.
3. On the Design Form window select Message and click Open.
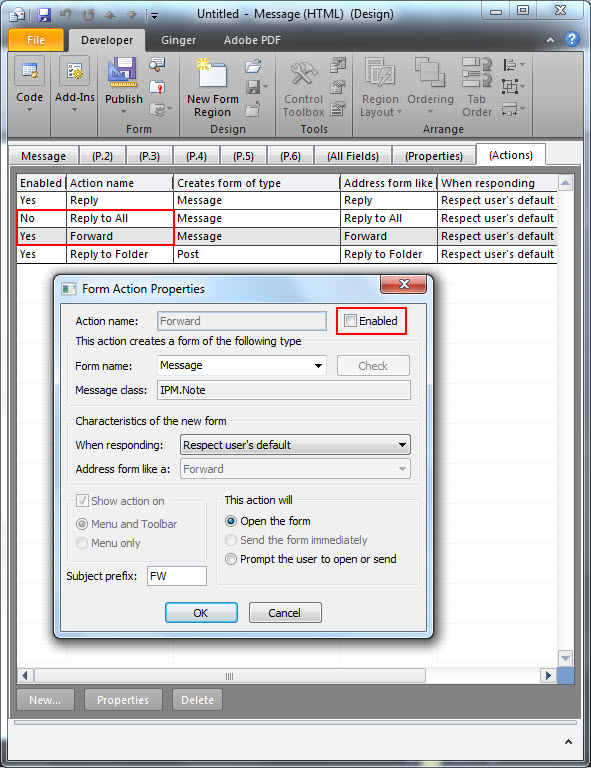
4. Click on the (Actions) tab right above the To field.
5. You will see a list of actions featured for the response to your message(s).
6. Double click on Reply to All under the Action Name column and deselect the Enabled checkbox to disable the option.
7. Double click on Forward in the same column and deselect the Enabled checkbox to disable the option.
8. Go to the (Properties) tab next to (Actions) and select the Send Form Definition with Item checkbox.
9. A popup will appear warning about the option not being a recommended practice. Click OK anyway.

10. Now from the Menu bar go to the Developer tab. Under the Form group select Publish and click on Publish Form.
11. On the Publish Form As window choose Personal Forms Library from the Look In box.
12. Now type in a name in the Display Name field for the Form you have created.
13. Similarly type in a Form Name however, this must be without any spaces.
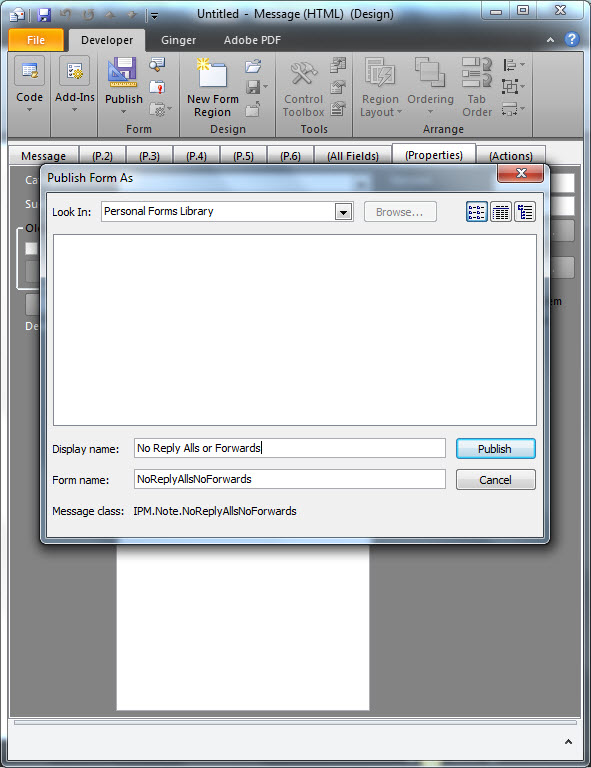
14. Click on Publish
15. Finally, go to the File menu and click on Close.
NOTE: It is advised that the user click No when asked to save the changes. Reason being, the custom form is already saved and the prompt is only asking you to save changes for Outlook’s default message form. Therefore, you must choose to save the changes only for this form.
Verdict
This is how you disable Reply All in Outlook. In order to test the settings, once you have created the custom form, go to the Developer tab and select Choose Form. On the window, select Personal Forms Library (where you saved the form) and choose the form once listed on the window and click Open.
Now when you send the message, the specified parameters will be implemented, i.e. your recipients will not be able to Reply to All or Forward the message.