Exchange On-Premise to Exchange Online Migration – Best Possible Way
- Why Should Users Migrate From Exchange On-Premise to Exchange Online?
- Pre-Migration Preparation
- Migrate On-Premise Exchange to Exchange Online Quickly
- Migrate Exchange On-Premise to Exchange Online Manually
- Method 1. Cutover Migration Method
- Method 2. Staged Migration Method
- Method 3. Hybrid Migration Method
- Post Migration Checklist
- Conclusion
- Frequently Asked Questions
Do you need to migrate from Exchange On-premise to Exchange Online? Then you’re in the right place! This comprehensive guide will walk you through all the possible ways in which you can easily transfer your mailboxes. Whether you are an IT professional who manages large-scale migrations or a small-scale organization that needs to have a smooth transition, in this article we are going to provide you with a step-by-step breakdown of the entire process.
We are also going to discuss the benefits of migrating, the challenges that a user might face, and common methods that are used for Exchange on-premise to Exchange Online migration. Let us begin!
Why Should Users Migrate From Exchange On-Premise to Exchange Online?
There are several advantages to migrating from Exchange on-premise to Exchange online. This helps an organization stay efficient and competitive and improves the users’ overall productivity. This move to Exchnahe Online is not just about upgradation, but also about lowering costs, improving accessibility of data, and securing flexibility.
Here are the key benefits of moving to Exchange Online:
- Cost-Effectiveness: Maintaining an on-premise server is quite costly since it requires hardware, software, and maintenance of IT infrastructure. Exchange online, on the other hand, reduces these costs since it offers a subscription-based model that users can easily opt for.
- Scalability: Unlike the On-Premise servers, Exchange Online offers users a seamless ability to scale up. It grows with the needs of a business without the need for any additional infrastructure.
- Reduction of Downtime: Server downtime in Exchange Online becomes negligible. Since Microsoft hosts the server, disruptions are minimized in daily operations, and users get reliable uptime.
- No Maintenance Costs: Microsoft handles all the maintenance and updates of the servers. This helps reduce the burden on an organization and the IT team. It also eliminates the need to maintain the hardware or deal with downtimes.
- Remote Accessibility: Using Exchange Online, users can access their emails from any place, and at any time. Whether a team is working from different locations, or remotely, all of the data remains available to all the team members in real-time.
- Reduced Burden on IT department: The IT department does not need to manage and maintain the Exchange server due to Exchange on-premise to Exchange Online migration.
- Improved Security: The robust infrastructure of Microsoft helps users get advanced protection against threats.
Also Read: How to Migrate Lotus Notes to Exchange Online – A Perfect Technique
Pre-Migration Preparation
It can be a significant process for any organization to carry out Exchange On-Premise to Exchange Online migration. As we have already discussed, it can help users streamline access, improve maintenance, and improve the scalability of communication. There are some factors that need to be prepared in order to avoid data loss and minimize downtime.
- Understand the current environment.
- Plan the method of migration.
- Prepare the users and the organization for the move.
- Set up the environment for migration.
- Prepare the Exchange Server.
- Prepare the network for the migration process.
- The mailboxes should be prepared for the move.
- Create a plan to communicate with the users.
- Perform a pilot migration to find out the issues.
- Develop a plan for rollback if things don’t go according to plan.
Migrate On-Premise Exchange to Exchange Online Quickly
There are multiple tools available in the market through which the users can carry out the migration process. But there is one tool that is the best in the industry. It is the SysTools Exchange to Office 365 Migration Tool account. It is a tried and tested tool and is recommended by many experts if organizations or users are switching platforms. Have a look at its top features and know why it is the top-rated utility among tech experts.
- Migrate items such as Emails, Calendars, Contacts, and more.
- There is support for multiple mailbox migrations at once using the credentials of the admin.
- You can transfer the newly arrived data using the Delta Migration feature.
- Users can also migrate selective data using the date filter option.
- There is also a provision to retry the failed migration for an uninterrupted migration process.
Steps to migrate On-Premise Exchange to Exchange Online
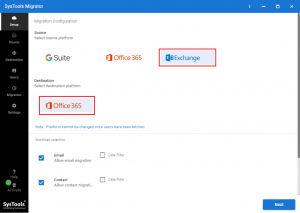
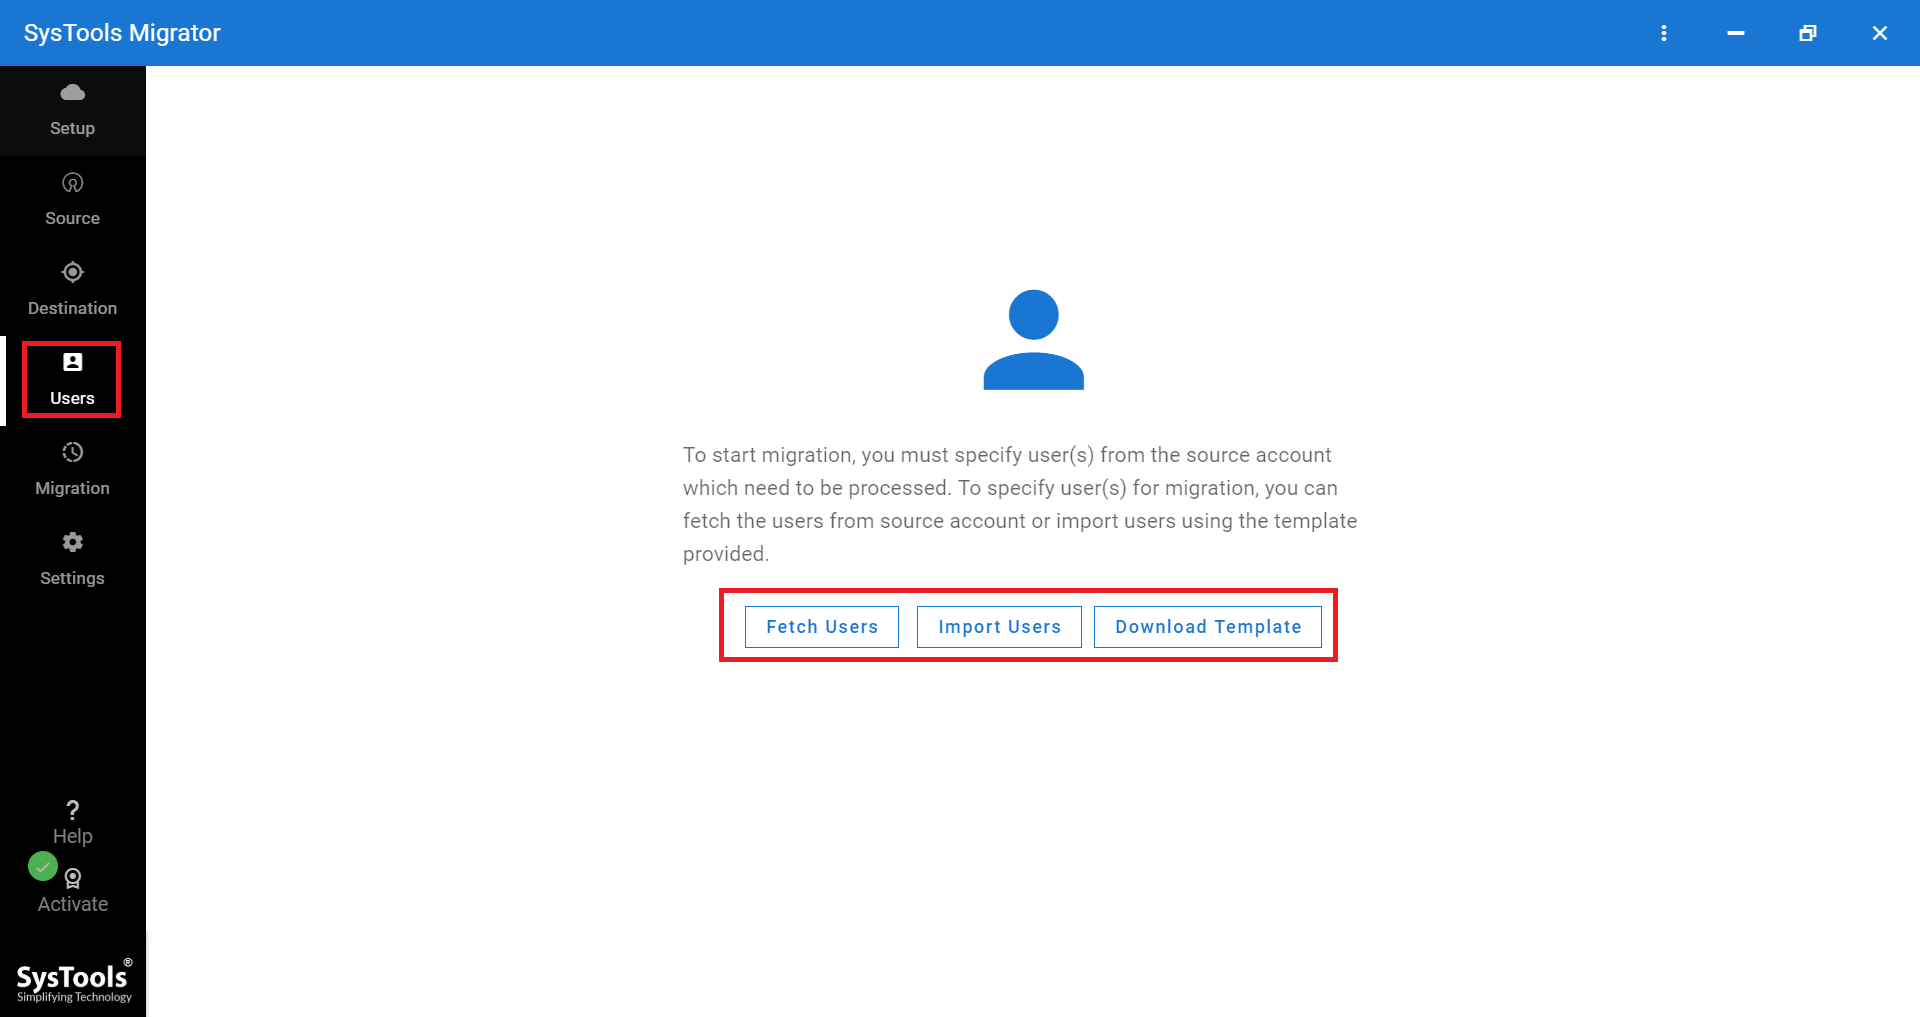
- Launch Tool & Select Exchange as Source and Office 365 as Destination Account.
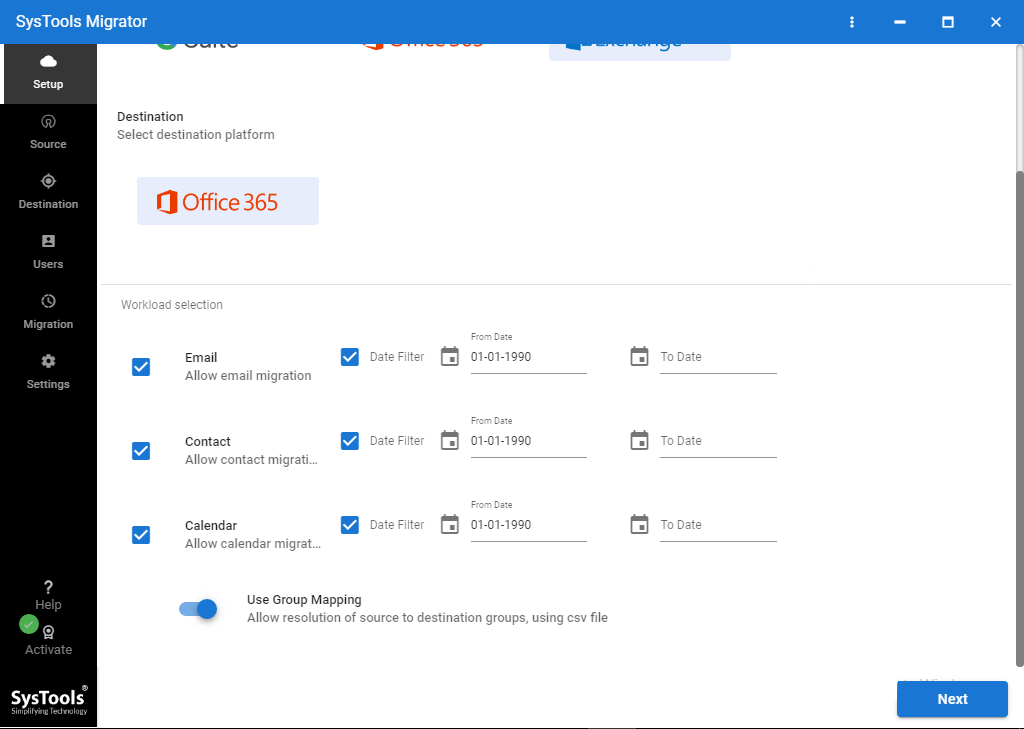
- Under Workload Selection, Select Categories and Apply Date-Range Filter if Required.
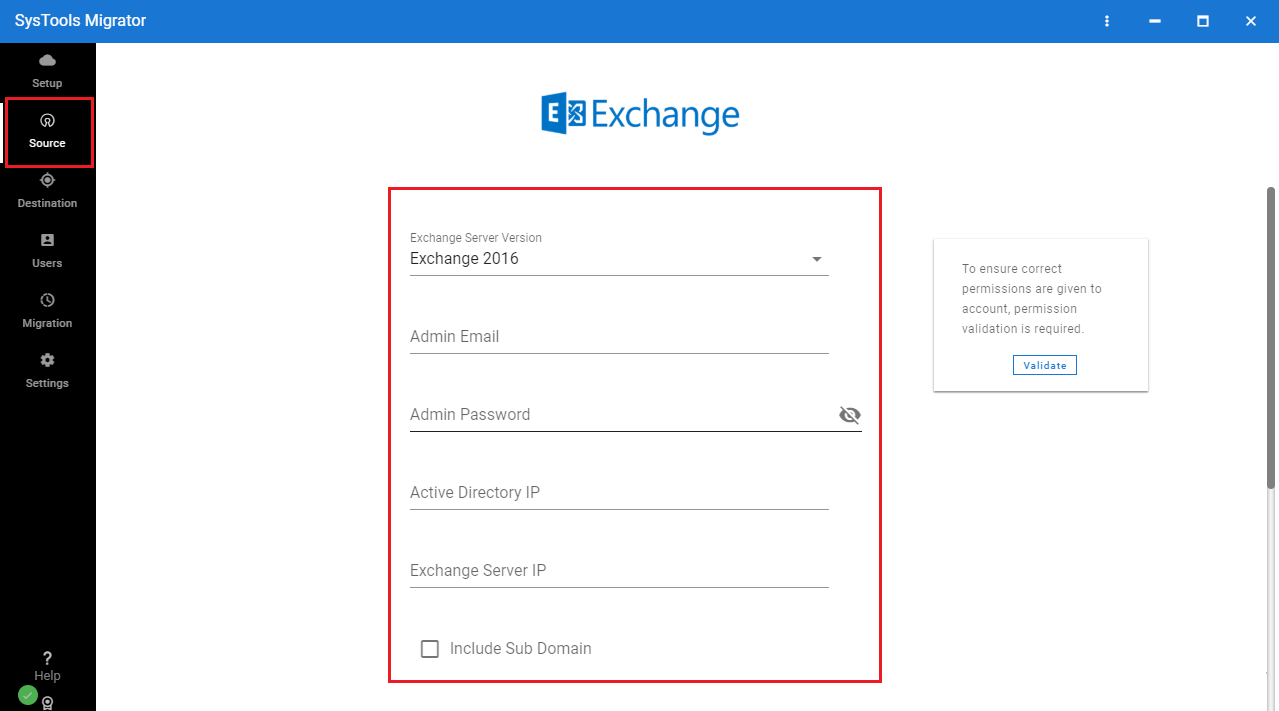
- Fill Exchange Server Details along with Admin Email ID and Password.
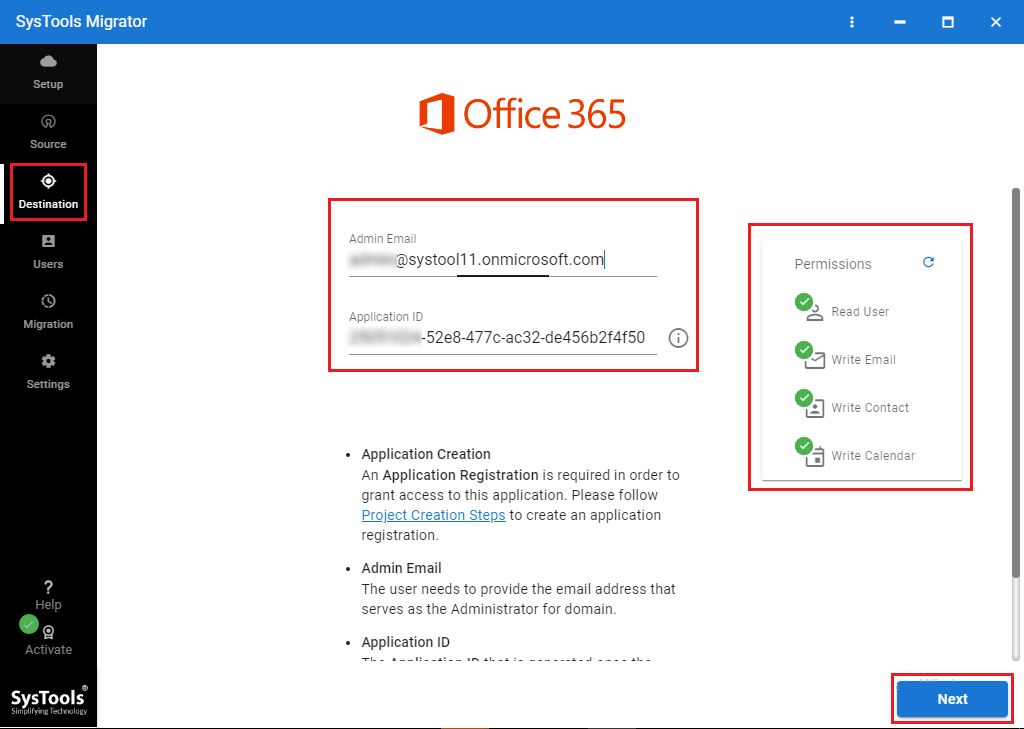
- Now, Enter Office 365 Admin ID and Application ID and Validate them.
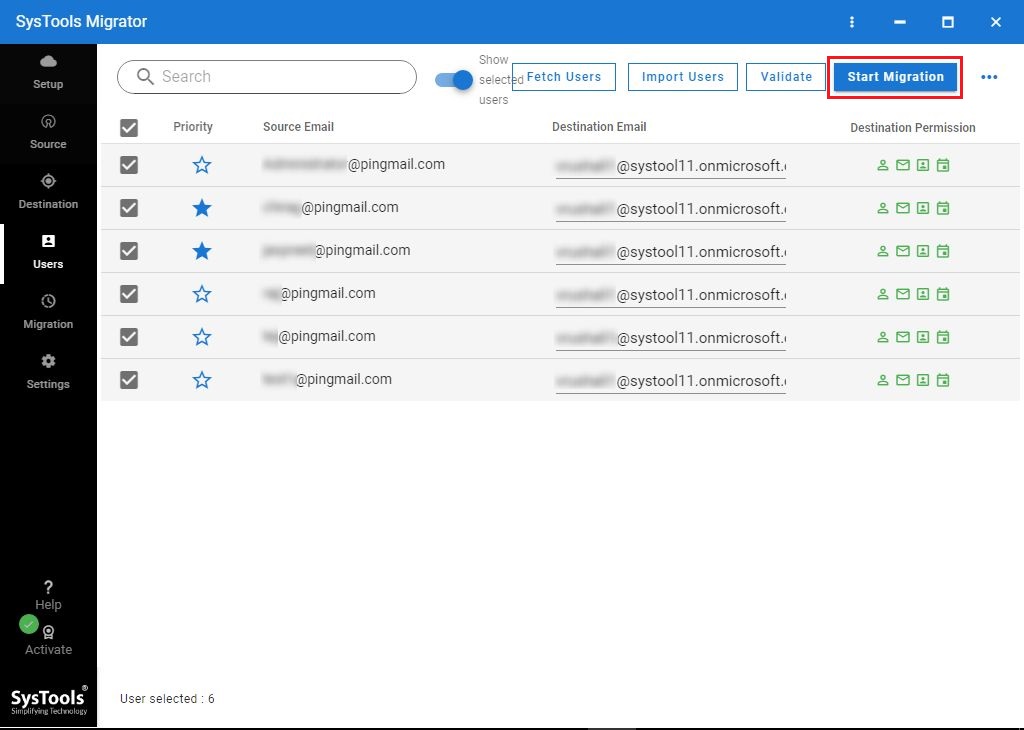
- Fetch or Import Users into the tool and Map Source & Destination mailboxes.
- Click on the Start Migration button to Migrate On-Premise Exchange to Exchange Online.
Migrate Exchange On-Premise to Exchange Online Manually
Numerous ways can be used to move On-Premise Exchange mailboxes. But with each technique or method, there are some restrictions and conditions that need to be followed. A user can choose any method that suits the best and fulfills all their demands.
- Direct Migration to Exchange Online
Also Read: How to Repair Exchange Database Without Log Files
Method 1. Cutover Migration Method
This is an approach that is suited for organizations that are small to medium in size. These organizations’ main requirements are to migrate all their mailboxes over a short period and to move less than 2,000 mailboxes. This includes shifting all the users simultaneously and needs careful planning to minimize the disruptions.
Here are the steps to use this method:
- Verify that you own the domain.
- Prepare the Exchange Server and ensure that it has a valid SSL certificate.
- In the admin center, go to REcipients > Migration > “+” > Migrate to Exchange Online > Cutover Migration.
- Configure the migration settings. Provide the details of the on-premise account with all the necessary permissions to access mailboxes.
- Start the migration process.
- Once the mailboxes are synchronized, you should now update the DNS records.
- You can now complete the migration batch in the Exchange Admin Center.
- Assign licenses to all the migrated users.
- Test, and confirm that everything is functional and ensure that all the users can access their mailboxes successfully.
Limitations of this method:
- It is only suitable for small environments.
- This process requires downtime to completely carry out the migration process.
- It is not ideal for hybrid setups or ongoing data migration processes.
Method 2. Staged Migration Method
Staged Migration is used when a user wants to move the mailboxes in batches over time, rather than migrating them all at once. This is generally used by larger organizations that have more than 2,000 mailboxes to migrate. It is also used when these organizations want to maintain both the online as well as the on-premise mailboxes. It is important to note that the staged migration process can only be supported for Exchange 2003 or Exchange 2007.
Here are the steps to perform a staged migration
- Verify that you own the domain.
- Ensure that the Exchange server has proper valid SSL certificates that are from an authority that is trusted.
- You must also set up directory synchronization.
- Create a CSV file that lists all the mailboxes that users need to migrate. It should include the email address, username, and the password.
- Go to recipients > Migration > “+” > Migrate Exchange Online > Staged migration, and then choose the CSV file that was created.
- Update the DNS records.
- Assign the licenses to the users who had their mailboxes migrated. You can also change the MX records so that the new mail is delivered to the new environment.
- Decommission the On-Premises Exchange Server.
Limitations of the Staged Migration process:
- It is only compatible with Exchange 2003 or 2007.
- Completing the migration process through this method can take several days or even weeks depending on the number of mailboxes.
Method 3. Hybrid Migration Method
It is a method that provides users with seamless integration between Exchange Online and Exchange On-Premise while migrating the mailboxes. It is often used by large businesses that need to maintain both on-premise as well as online mailboxes for a significant time. This allows users to move mailboxes to Office 365 in small batches over some time and also provides them with a unified email experience.
- Verify the domain that you use for emails.
- Prepare the configuration of the Exchange server for hybrid deployment.
- Set up the Directory Synchronization in order to copy your on-premise AD users.
- Run the hybrid configuration wizard which is a tool that helps users automate setting up the hybrid deployment.
- In the Exchange Admin Center, go to Recipients > Migration > “+” > Migrate to Exchange Online > Remote move migration.
- Now, assign the licenses to the users so that they can access their mailboxes.
- This requires ongoing management to ensure that it continues working as expected.
Limitations of the Hybrid Migration method:
- Carry Out Migration vis PST File
A user can also use Outlook PST files to export their crucial Exchange On-Premise data. If a user is using Exchange 2007 or any of the previous versions, then with the help of the ExMerge utility or by using the Exportmailbox command, the process of migrating On-Premise Exchange to Exchange Online can be carried out. On the other hand, if users are using Exchange 2010 or a later version then they can utilize the advanced feature of the new Mailboxexport Powershell command to import PST files to Office 365.
Post Migration Checklist
After a successful Migration process, you can now follow some important post-migration tasks that ensure a seamless transition for the users:
- Verify the integrity of the mailbox: It is important to confirm that all of the emails and folders have migrated successfully. You can use tools available in Exchange Online or the migration software to verify the contents of the mailbox.
- Training of Users and Providing Support: You can provide users with training on how to access their mailboxes in Exchange Online, and also support them if any issue arises.
- Decommissioning of Old Servers: Once the users are confident that the Exchange Online is functioning properly, and the users are comfortable with the new environment, you can then decommission the old server. However, this is an optional step, meaning that you can keep it running according to your needs.
Conclusion
Exchange On-Premise to Exchange Online migration is not an easy task to perform for many organizations as it is a critical and complex procedure. To carry out this method correctly, with no problem of data loss and compromising data integrity, we advise that you use automated tools. The main reason is- it reduces all the risks involved during the procedure and performs the migration seamlessly with less user’s input. However, we have also discussed all the alternative approaches that can be used along with the restrictions that tag along with them in this article.
Frequently Asked Questions
Q1. How long does a migration process take?
The time taken depends on the number of mailboxes and their size. Several small organizations can complete the migration process in a day, while it may take weeks or months to migrate for a large organization.
Q2. Can a user migrate a public folder to Exchange Online?
Users can migrate Public folders either using the specialized tool which can make the entire process hassle-free and less time-consuming, or opt for the manual methods.
Q3. Can the data of the user be intact during the migration?
While there are some risks of losing data with manual methods, using automated tools can significantly reduce these risks.
Q4. After the migration process, how can I ensure compliance?
Office 365 includes built-in security and compliance features. However, it is important to note that you should review the needs during as well as after the migration process.
